
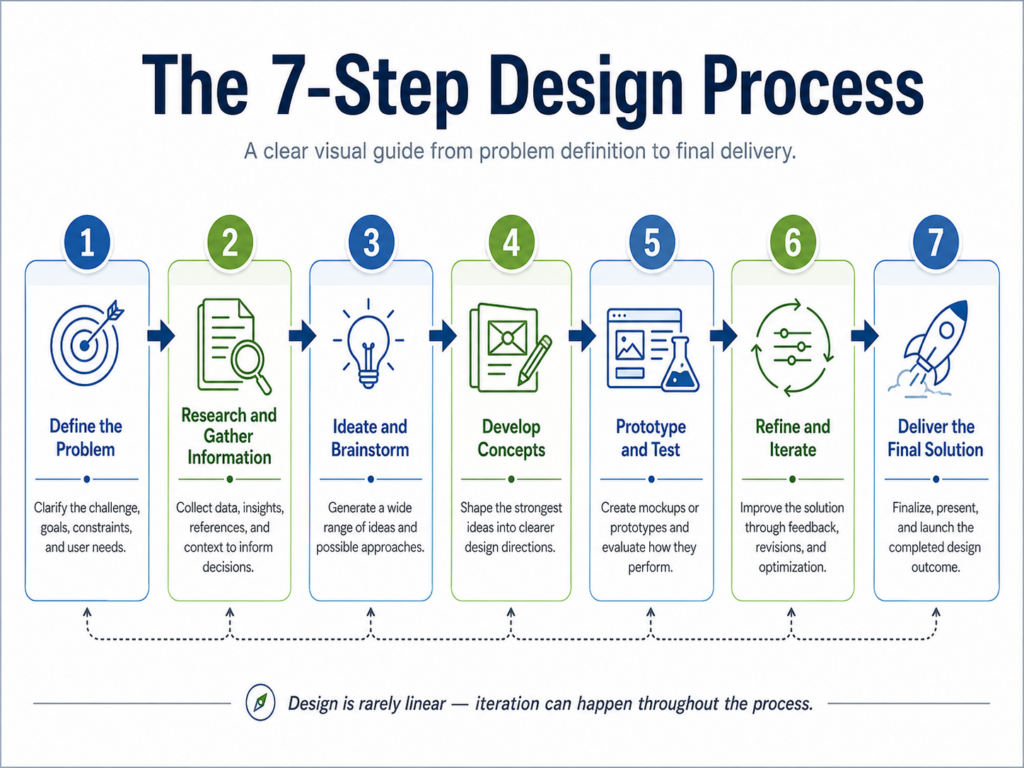
The 7 steps in the design process are: Define the Problem, Research and Gather Information, Ideate and Brainstorm, Develop Concepts, Prototype and Test, Refine and Iterate, and Deliver the Final Solution. Each step builds on the last, creating a structured path from a vague idea to a resolved, real-world outcome that genuinely serves its intended purpose.
Most design projects don’t fail because of bad ideas. They fail because someone skipped a step early on, usually the research or the testing, and didn’t realize it until the deadline was already in the rearview mirror. Whether you’re designing a product, a building, a digital interface, or a marketing campaign, the process matters as much as the outcome. Understanding how the 7 steps actually work in practice, not just in theory, is what separates projects that land from ones that get shelved.
Key Takeaways
- The design process is a repeatable framework used across industries, from architecture and software to product and brand design.
- Step 1 (Define the Problem) is the most underestimated phase. Vague briefs almost always produce vague outcomes.
- Research and ideation are separate steps for a reason. Jumping to ideas before gathering information leads to solutions that miss the real need.
- Prototyping doesn’t have to be expensive. Early-stage testing with rough drafts catches critical errors before they become costly revisions.
- Iteration is built into the process. Looping back between steps is normal and expected, not a sign of failure.
- Delivery is not the final step in spirit. A great final solution includes documentation, handoff, and a clear record of decisions made.
Why a Structured Design Process Actually Matters
There’s a temptation, especially with experienced designers, to treat a formal process as bureaucracy. “I know what I’m doing, I don’t need a framework.” That thinking tends to work on small, familiar projects. When complexity increases or when stakeholders are involved, unstructured design work produces inconsistent results.
The 7-step process isn’t about limiting creativity. It’s about giving creativity a container. The research phase opens possibilities. The ideation phase generates options. The testing phase reveals the truth. Without the structure, most teams rush from brief to deliverable and miss the insight that would have made the work genuinely good.
Related Blog: What Is the Meaning of Design-Build?
Studies in design management consistently show that projects with clearly defined discovery phases experience significantly fewer costly revisions during production. Some estimates suggest that fixing a design error after development begins costs 5 to 10 times more than catching it during the planning stage.
The 7 Steps in the Design Process, Explained
Step 1: Define the Problem
This is where most projects go wrong before they even start. A problem statement that reads “make it look better” or “users aren’t engaging” is not a design brief. It’s a symptom. Real problem definition involves asking why until you reach something actionable.
A useful problem statement names who is affected, what they’re struggling with, and what a successful resolution looks like. For example: “First-time users on our platform can’t locate the save function within the first session, leading to data loss and abandoned signups.” That gives a designer something to work with. A vague complaint does not.
Step 2: Research and Gather Information
Research gets cut when timelines get tight. That’s almost always a mistake. This phase includes user interviews, competitive analysis, technical constraints review, and any relevant precedent work. The goal is to arrive at the ideation phase with genuine insight, not assumptions.
NEEDS CITATION
Research conducted at the Nielsen Norman Group has found that usability testing with as few as 5 users can identify up to 85% of major usability issues, making even lightweight research dramatically more valuable than skipping it entirely.
Step 3: Ideate and Brainstorm
Ideation is deliberately divergent. The goal is volume, not quality. Teams that filter ideas too early in this phase tend to converge on the obvious solution, which is rarely the best one. Methods like mind mapping, “How might we?” prompts, rapid sketching, and constraint-based thinking help generate the unexpected angles that make a project memorable.
One practical note: separate ideation sessions from critique sessions. When evaluation happens simultaneously with generation, people self-censor. Let ideas exist before judging them.
Step 4: Develop Concepts
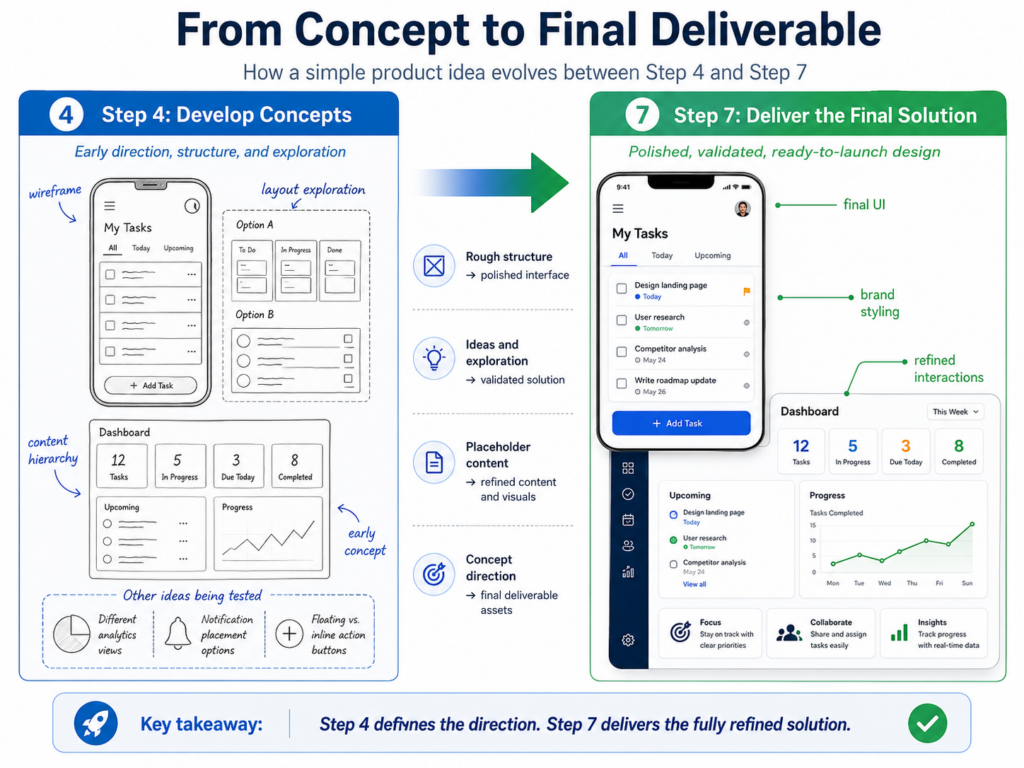
From the brainstorm pool, a small number of promising directions get developed into actual concepts. This is where a handful of rough ideas become something testable. Concepts at this stage are not finished work. They’re structured enough to communicate intent, nothing more.
For product or architectural projects, this often means sketches, wireframes, or physical maquettes. For brand or communication design, it might mean rough layouts and type explorations. The standard here is “clear enough to evaluate,” not “ready to present to a client.”
Step 5: Prototype and Test
Prototyping is one of the most misunderstood steps. Teams often delay it because they think a prototype has to be polished. In practice, the rougher and faster the prototype, the better. A paper mockup, a clickable wireframe, or a cardboard model all serve the same function: they make abstract thinking tangible and testable.
According to design thinking research from IDEO and Stanford’s d.school, teams that prototype early and frequently typically reduce overall project development time by 30 to 50 percent compared to teams that prototype only near the end of the process.
Testing during this phase should involve real users or genuine stakeholders whenever possible. Feedback from a colleague who already understands the context is far less valuable than feedback from someone encountering the concept cold, just like your actual audience will.
Step 6: Refine and Iterate
This is the step that separates good design from great design. Refinement is where you take what you learned from testing and apply it honestly. Not defensively. Not by explaining why the feedback is wrong. By genuinely asking what the feedback reveals about the design’s shortcomings.
Iteration might loop back to Step 3 or Step 4 if testing reveals a fundamental flaw in the concept. That’s not a failure. That’s the process working exactly as designed. Projects that never loop back are usually the ones where teams were too afraid to surface real problems.
Step 7: Deliver the Final Solution
Delivery is more than handing over a file. A complete deliverable includes production-ready assets, documentation of decisions, rationale for major choices, and a clear handoff to whoever implements or maintains the work going forward. Without that context, even great design breaks down during execution.
A survey of design teams across software, architecture, and product industries found that projects with thorough handoff documentation were 40% less likely to require post-delivery revisions within the first 90 days of implementation.

Step-by-Step: The 7 Design Process Phases at a Glance
- Define the Problem — Clarify who is affected, what they need, and what a resolved outcome looks like. Write it down explicitly.
- Research and Gather Information — Conduct user research, competitive review, and constraints analysis before generating any solutions.
- Ideate and Brainstorm — Generate as many ideas as possible without filtering. Quantity precedes quality at this stage.
- Develop Concepts — Narrow to 2 to 4 strong directions and develop them into testable concepts using sketches, wireframes, or models.
- Prototype and Test — Build low-fidelity prototypes quickly and test with real users. Prioritize learning over presentation.
- Refine and Iterate — Apply feedback honestly. Loop back to earlier steps if testing reveals a deeper issue.
- Deliver the Final Solution — Provide production-ready work alongside documentation, rationale, and a structured handoff.
How the 7 Steps Compare Across Different Design Disciplines
| Design Discipline | Where Most Time Is Spent | Most Common Step Skipped | Biggest Risk If Skipped |
| Architecture / Construction | Steps 4 and 5 (Concepts + Prototyping) | Step 2 (Research) | Costly structural or compliance revisions |
| UX / Product Design | Steps 5 and 6 (Prototype + Iterate) | Step 1 (Problem Definition) | Building the wrong feature entirely |
| Brand / Graphic Design | Steps 3 and 4 (Ideation + Concepts) | Step 7 (Delivery documentation) | Inconsistent implementation by third parties |
| Industrial / Product Design | Steps 2 and 5 (Research + Testing) | Step 6 (Iteration) | Manufacturing defects identified post-launch |
Common Mistakes That Undermine the Design Process
- Treating Step 1 as administrative. Problem definition is the most strategically important phase. Teams that rush through it typically produce solutions to the wrong problem.
- Conflating research with Googling. Secondary research has its place, but primary research with actual users or stakeholders is irreplaceable. Assumptions based on industry trends often miss what real people actually need.
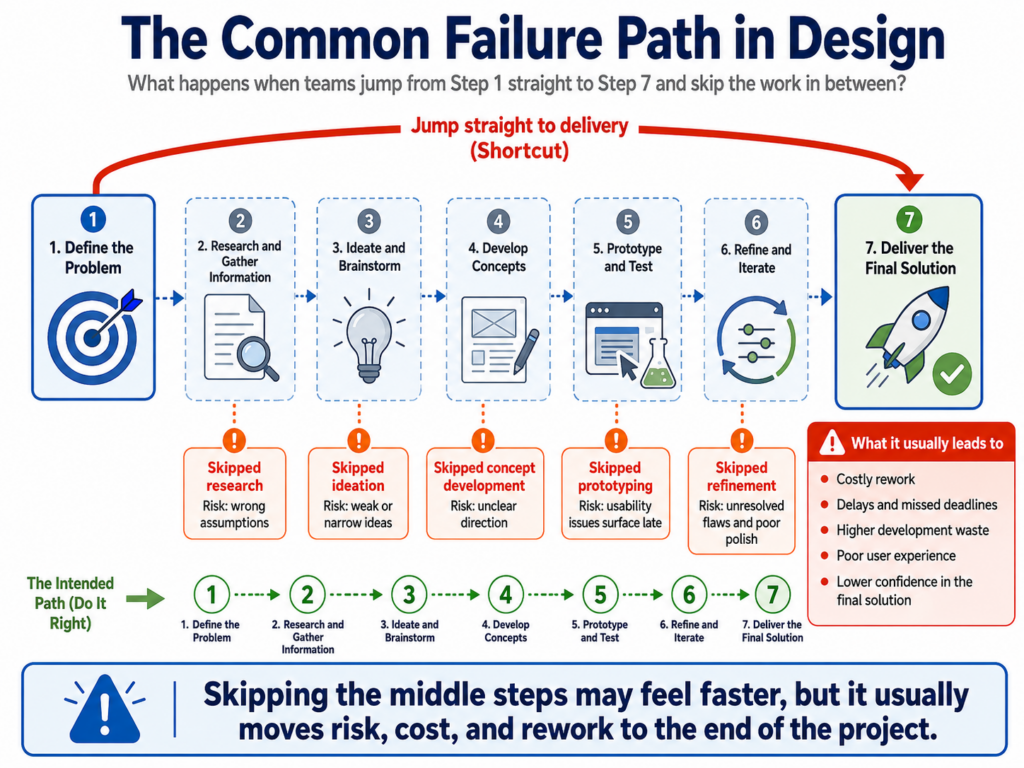
- Skipping straight from concept to final. The space between Step 4 and Step 7 is where the quality happens. Eliminating Steps 5 and 6 to hit a deadline usually means paying for it later in revisions.
- Confusing iteration with indecision. Looping back through steps after testing is not a failure of process. It’s the process. Teams that refuse to iterate typically deliver work that looked good internally but didn’t survive contact with real users.
- Incomplete delivery packages. Sending final files without context, rationale, or documentation puts all the interpretive burden on whoever implements the work. Important design decisions get lost, and the output suffers for it.
- Running ideation and critique simultaneously. Evaluation during brainstorming kills creative range. Keep generation and assessment in separate sessions, especially with mixed teams that include non-designers.
What the Design Process Looks Like Inside a Real Project
Consider a mid-sized construction firm using Buildform to manage client intake and project scoping. In the early stages of designing a new client portal, the temptation was to start with visual mockups immediately. The project lead looked polished and the deadline was close.
What actually happened: the team ran three user interviews with existing clients first (Step 2), discovered that clients didn’t care about visual aesthetics at all, they cared about being able to track approval status in real time. That single insight repositioned the entire concept. The visual direction changed completely. Two rounds of prototype testing (Step 5) confirmed the new approach worked. The final delivered portal reduced client follow-up emails by a measurable margin, something the original concept would never have achieved.
That’s the process working. Not because it’s rigid, but because each step forced the team to confront what they didn’t yet know.
Design Process vs. Design Thinking: Are They the Same?
| Aspect | 7-Step Design Process | Design Thinking |
| Scope | Execution framework for a single project | Mindset and cultural approach to problem-solving |
| Structure | Sequential with defined stages | Non-linear and iterative by nature |
| Best for | Projects with defined deliverables and timelines | Open-ended innovation and ambiguous challenges |
| Overlap | Shares empathy, prototyping, and iteration | Shares empathy, prototyping, and iteration |
In practice, they complement each other well. Design thinking provides the philosophical grounding for why you follow a process. The 7-step framework gives you the practical structure for actually doing it.
Frequently Asked Questions
What are the 7 phases of design?
The 7 phases of design are: Define the Problem, Research and Gather Information, Ideate and Brainstorm, Develop Concepts, Prototype and Test, Refine and Iterate, and Deliver the Final Solution. These phases apply broadly across design disciplines, from product and architectural design to UX and brand identity work. Each phase has a distinct goal, and skipping any one of them typically creates problems that surface later in the project.
What are the 7 basic elements of design?
The 7 basic elements of design are line, shape, form, space, texture, color, and value. These are the foundational visual building blocks used across all visual design disciplines. They’re distinct from the design process itself, which describes how a project is executed. The elements describe what designers work with; the process describes how they work through a problem.
What are the 7 layers of design?
The concept of 7 layers in design varies by discipline. In architecture and construction, the 7 layers often refer to Brand’s “shearing layers”: site, structure, skin, services, space plan, stuff, and sometimes a social layer. In UX, layers may describe the hierarchy from business goals through information architecture down to surface aesthetics. The term is used differently across fields, so context matters when you encounter it.
What are the 7 steps of the design process?
The 7 steps of the design process are: Define the Problem, Research and Gather Information, Ideate and Brainstorm, Develop Concepts, Prototype and Test, Refine and Iterate, and Deliver the Final Solution. This framework is used in engineering design, product development, architecture, UX design, and many other fields. The steps are sequential but not rigid. Looping back between steps after testing is a normal and healthy part of the process.
What are the 7 layers?
When designers refer to “the 7 layers,” they’re usually drawing from Stewart Brand’s model of how buildings change over time, or from a UX perspective, the layered structure of a user experience from strategy to surface. In network or systems contexts, the 7 layers reference the OSI model. The specific meaning depends on the discipline. In most design conversations, the 7 layers describe levels of abstraction from strategic intent down to tangible execution.
Final Thoughts: The Process Is the Work
Design without process is just decoration. The 7 steps exist because real problems are complex, users are unpredictable, and even experienced designers benefit from a structure that forces honest questioning at every stage. The steps aren’t a bureaucratic checklist. They’re a framework for doing the thinking that separates work that’s merely finished from work that genuinely solves something.
If you’re working on a project right now, the most valuable thing you can do is go back to Step 1 and ask whether the problem you’re solving is actually the right one. More often than not, that question alone changes everything that follows.
Ready to bring a more structured, results-driven design approach to your next project? The team at Buildform works with clients who want their projects built on clear process, not guesswork. Reach out to discuss your project and find out how a disciplined design approach from the start can save time, reduce revisions, and produce outcomes that actually hold up.